Model-View-Presenter and Model-View-ViewModel in Prism March 23, 2009
Posted by wesaday in Programming.Tags: CAL, CodeProject, Composite Application Library, Model View Presenter, MVVM, Prism, WPF
5 comments
Introduction
One of the most valuable skills a developer can develop is the ability to seperate UI modules, business rules and data access modules so that they are more maintainable. This separation means that the modules can be developed independently of each other without the changes having any impact on other modules. After several years in the business you get kind of tired of making a change and then having to chase down a bug that made its way in your application affecting modules that you never thought your change would touch you will come to appreciate separating out the code into different modules. Prism actually makes this pretty simple.
The first design pattern that will be demonstrated is the Supervising Presenter pattern that most closely resembles the Model-View-Presenter pattern so if you understand the MVP pattern then you should have no problem understanding this. For more information on the Supervising Presenter pattern see the Supervising Presenter topic in the Prism documentation.
A simple diagram for the MVP pattern looks like this:
The second design pattern that will be demonstrated is the Presentation Model or Model-View-ViewModel pattern. For more on the Presentation Model pattern see the Presentation Model topic in the Prism documentation.
A simple diagram of the Presentation Model pattern looks like this:
The foundation for this demonstration is the final project from the Getting Started article which you can get here.
First the MVP pattern
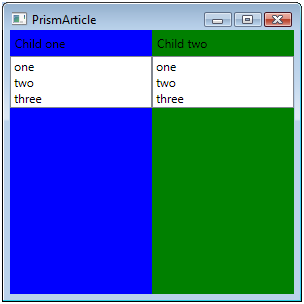
The first thing to do is to decide what kind of data that we are going to display in the view and how we are going to display it. For this simple example we are going to display some strings in a ListBox. So the final ChildOneView will look like this:
The second thing to do is to create some folders within the project to hold the various files that we are going to be creating. This helps to keep the clutter down. Right click on the ChildOneModule project and add a NewFolder named “Interfaces”. Add two more folders and name them “Presenters” and “Services”. Now we are going to need to create three interfaces, one for the View, one for the Model and one for the Presenter. After that your project will look something like this
The interfaces are very simple. The Model interface will expose a collection strings that the view will bind to.
public interface IChildOneService
{
ObservableCollection<string> GetStrings();
}
The Presenter interface will need to have a reference to the View:
public interface IChildOnePresenter
{
IChildOneView View { get; set; }
}
And finally, the View will need to have a reference to the data that the Model is going to expose:
public interface IChildOneView
{
ObservableCollection<string> Model { get; set; }
}
That pretty much does it for the interfaces. The next thing to do is to create a class that will serve as the Model. Right click the Services folder and add a new class named “ChildOneService”. The service will need to implement the IChildOneService interface that we created earlier.
public class ChildOneService : IChildOneService
{
public ObservableCollection<string> GetStrings()
{
ObservableCollection<string> strings = new ObservableCollection<string> { “one”, “two”, “three”};
return strings;
}
}
The GetStrings method will return the string collection and that is what is going to be displayed in the View. It’s important to realize that the data that is displayed could come from anywhere, a file, a database, a web service, etc.
The Presenter class is also very simple. Create a ChildOnePresenter class in the “Presenters” folder and have it implement the presenter interface. The Presenter will need a reference to the view and the model passed to it in the class constructor.
public class ChildOnePresenter : IChildOnePresenter
{
public IChildOneView View { get; set; }
public ChildOnePresenter(IChildOneView view, IChildOneService model)
{
View = view;
View.Model = model.GetStrings();
}
}
Open the view code-behind file. Modify the class definition to implement the IChildOneView interface. The view interface is implemented as a property that is used to data bind to. The data is transferred from the ChildOneService class to the View by the Presenter.
public partial class ChildOneView : UserControl, IChildOneView
{
public ChildOneView()
{
InitializeComponent();
}
public ObservableCollection<string> Model
{
get
{
return DataContext as ObservableCollection<string>;
}
set
{
DataContext = value;
}
}
}
Open the View XAML file and modify the view to include a listbox and bind the listbox item data source to the string collection.
<StackPanel>
<Label Content=”Child one” />
<ListBox ItemsSource=”{Binding}” />
</StackPanel>
The last step is to modify the module class. We need to include a reference to the container so that we can notify the container that we have additional classes for it to instantiate. Once that is done, then we register the Model, View and Presenter with the container
public class ChildOne : IModule
{
private readonly IRegionManager _regionManager;
private readonly IUnityContainer _container;
public ChildOne(IUnityContainer container, IRegionManager regionManager)
{
_regionManager = regionManager;
_container = container;
}
public void Initialize()
{
_container.RegisterType<IChildOneService, ChildOneService>();
_container.RegisterType<IChildOnePresenter, ChildOnePresenter>();
_container.RegisterType<IChildOneView, ChildOneView>();
ChildOnePresenter presenter = _container.Resolve<ChildOnePresenter>();
_regionManager.Regions[“LeftChild”].Add(presenter.View);
}
}
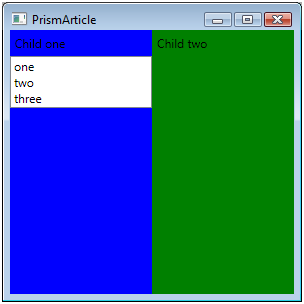
If you compile and run the application at this point, you should see a window like the picture up top. That is how to implement the MVP pattern in Prism.
Model-View-ViewModel
The MVVM pattern is implemented in almost the same way. The only real difference is the way the View displays its data. MVVM relies heavily on data binding and Commands to get things done. This article is not going to cover Commands. That is something for another time.
To begin, create folders in the ChildTwoModule project named Interfaces, Services and ViewModels. You should turn out with something that looks like this:
For this example we will need three interfaces, IChildTwoModel, IChildTwoView and IChildTwoViewModel. As in the previous example, the Model will export a list of strings so our interface for the Model will look like this:
using System.Collections.ObjectModel;
public interface IChildTwoModel
{
ObservableCollection<string> GetStrings();
}
The interface for the ViewModel will need to have a Property that exposes the list of strings to the View. The ViewModel will also need a reference to the View so our interface for the ViewModel will look like this:
public interface IChildTwoViewModel
{
ObservableCollection<string> ModelStrings { get; }
IChildTwoView View { get; }
}
The interface for the View will need a way to set the data to display. Since the ViewModel is exposing the data, the View needs a way to data bind the ViewModel to the View:
public interface IChildTwoView
{
void SetModel(IChildTwoViewModel model);
}
Now, on to the implementation. The Model class needs to implement the IChildTwoModel interface so create a new class in the Services folder named ChildTwoModel and then implement the interface. Remember that the interface is a method named GetStrings and returns a collection of string objects. So your Model class will look like this:
using Interfaces;
using System.Collections.ObjectModel;
public class ChildTwoModel : IChildTwoModel
{
public ObservableCollection<string> GetStrings()
{
ObservableCollection<string> strings = new ObservableCollection<string> { “one”, “two”, “three” };
return strings;
}
}
For the moment, I am going to skip over the ViewModel class as it is the most involved. Open up the View class and modify it to implement the IChildView interface. That brings in a method SetModel that will setup the data binding:
public partial class ChildTwoView : UserControl, IChildTwoView
{
public ChildTwoView()
{
InitializeComponent();
}
public void SetModel(IChildTwoViewModel model)
{
DataContext = model;
}
}
Now open up the ChildTwoView.xaml file. Change the Grid layout panel to a StackPanel, and then add a ListBox to the StackPanel. Set the ItemsSource to the bind to the ModelStrings.
<StackPanel>
<Label Content=”Child two” />
<ListBox ItemsSource=”{Binding ModelStrings}” />
</StackPanel>
Now we come to the ViewModel class. The ViewModel class in the MVVM pattern takes on a lot of responsibility. The ViewModel not only provides data to the View but it also keeps track of the View state and acting as a go-between to the Model. One thing that is a really nifty feature is that the ViewModel can automatically update the Views data just by raising a property changed event. Okay so our ViewModel class needs to implement the IChildTwoViewModel interface and the INotifyPropertyChanged interface. The class constructor will need a reference to the View and the Model and set the ViewModel in the View:
private readonly IChildTwoView _view;
private readonly IChildTwoModel _model;
private ObservableCollection<string> _modelStrings;
public ChildTwoViewModel(IChildTwoView view, IChildTwoModel model)
{
_view = view;
_model = model;
_modelStrings = new ObservableCollection<string>();
_modelStrings = _model.GetStrings();
View.SetModel(this);
}
The SetModel method sets the data binding to the ViewModel. Now if you remember the View data binds the ListBox to something called ModelStrings so we need to implement a Property to expose the model strings:
public ObservableCollection<string> ModelStrings
{
get
{
return _modelStrings;
}
set
{
_modelStrings = value;
OnPropertyChanged(“ModelStrings”);
}
}
The OnPropertyChanged event notifies the View that the data has changed (if it does) and to update the data in the View.
public event PropertyChangedEventHandler PropertyChanged;
private void OnPropertyChanged(string propertyName)
{
PropertyChangedEventHandler handler = PropertyChanged;
if (handler != null)
{
handler(this, new PropertyChangedEventArgs(propertyName));
}
}
The final thing is to modify the ChildTwoModule class to register the interfaces and the classes with the container just like we modified the ChildOneModule class.
public void Initialize()
{
_container.RegisterType<IChildTwoModel, ChildTwoModel>();
_container.RegisterType<IChildTwoViewModel, ChildTwoViewModel>();
_container.RegisterType<IChildTwoView, ChildTwoView>();
IChildTwoViewModel view = _container.Resolve<IChildTwoViewModel>();
_regionManager.Regions[“RightChild”].Add(view.View);
}
Now you should be able to compile and run that application and get a window similar to this:
This concludes out whirlwind (and simplistic) tour of the Model-View-Presenter pattern and the Model-View-ViewModel in Prism. Hopefully you have a foundation from which to build and explore more in Prism. The final demonstration project (VS2008) can be found here. Rename the doc to zip before you open the archive. This is a wordpress.com requirment.
MVVM in WPF Part II February 13, 2009
Posted by wesaday in Programming.Tags: CodeProject, Model-View-ViewModel, MVVM, WPF
11 comments
This is the second part in a two part article on the Model-View-ViewModel design pattern in WPF.
The Model
Our friend the Model is responsible for getting and holding onto the data. The data could come from anywhere, a file, a database, thin air, etc. Our Model is the one that is going to read the data out of the file and store it in a DataTable so that the ViewModel can present it to the View. So add a Model class to the Model project. I called mine “MainModel” because it’s going to the MainWindow. We are going to need three things in our Model, a constructor, a method to get the data from the file, and a property to expose the data to the outside world. The method is easy as we are just going to copy the same code from the previous article and make minor modifications to it. So here is our GetFileData method.
public bool GetFileData(string filename)
{
const string connectionString = @”Provider=Microsoft.Jet.OLEDB.4.0;Data Source=c:\csvfiles\;Extended Properties=’text;HDR=Yes'”;
string commandText = string.Format(“Select * from {0}”, filename);
OleDbConnection conn = new OleDbConnection(connectionString);
conn.Open();
OleDbDataAdapter da = new OleDbDataAdapter(commandText, conn);
DataSet temp = new DataSet();
da.Fill(temp);
FileData = temp.Tables[0];
return true;
}
Here we are opening a file from the C:\csvfiles directory and filling a DataTable with the results. FileData is the name of the property that is holding the data. So lets add that next.
public DataTable FileData
{
get; set;
}
Pretty simple. The only thing left to do is to add the constructor.
public MainModel()
{
FileData = new DataTable();
}
That’s it for the Model. Remember to reference the System.Data and OleDb namespaces for the GetFileData method. Here is the complete listing for the Model.
namespace Article.Model
{
using System.Data;
using System.Data.OleDb;
public class MainModel
{
public MainModel()
{
FileData = new DataTable();
}
public DataTable FileData
{
get; set;
}
public bool GetFileData(string filename)
{
const string connectionString = @”Provider=Microsoft.Jet.OLEDB.4.0;Data Source=c:\csvfiles\;Extended Properties=’text;HDR=Yes'”;
string commandText = string.Format(“Select * from {0}”, filename);
OleDbConnection conn = new OleDbConnection(connectionString);
conn.Open();
OleDbDataAdapter da = new OleDbDataAdapter(commandText, conn);
DataSet temp = new DataSet();
da.Fill(temp);
FileData = temp.Tables[0];
return true;
}
}
}
Nothing to it. That is it for the Model. Next we will move to the ViewModel.
The ViewModel
Most of the action happens in the ViewModel so it naturally follows that the ViewModel is the most complex which was my stumbling block. There is so much that can, and does, go on in there that it can quickly get confusing. The very first thing to do is to create a base ViewModel class that we could use to base our ViewModels on. For this simple example it really is not necessary but it does serve as a good base to build from. So add a new class to the ViewModels folder in the project and call it BaseViewModel. Make the base class abstract and implement the INotifyPropertyChanged and IDisposable interfaces. Implementing those interfaces in the base class saves us from having to implement them in each and every other ViewModel. Some of this code is strictly for debugging purposes and those are commented. I believe that 99% of the base class code was Josh Smiths. I added some code comments but that was about it. This is the code stripped down. Not much to it and should be pretty much self explanatory.
public abstract class BaseViewModel : INotifyPropertyChanged, IDisposable
{
protected BaseViewModel()
{
}
~BaseViewModel()
{
string msg = string.Format(“{0} ({1}) ({2}) Finalized”, GetType().Name, DisplayName, GetHashCode());
Debug.WriteLine(msg);
}
public event PropertyChangedEventHandler PropertyChanged;
public virtual string DisplayName
{
get; protected set;
}
protected virtual bool ThrowOnInvalidPropertyName
{
get; private set;
}
public void Dispose()
{
OnDispose();
}
[Conditional(“DEBUG”)]
[DebuggerStepThrough]
public void VerifyPropertyName(string propertyName)
{
// Verify that the property name matches a real,
// public, instance property on this object.
if (TypeDescriptor.GetProperties(this)[propertyName] == null)
{
string msg = “Invalid property name: “ + propertyName;
if (ThrowOnInvalidPropertyName)
{
throw new Exception(msg);
}
Debug.Fail(msg);
}
}
protected virtual void OnDispose()
{
}
protected virtual void OnPropertyChanged(string propertyName)
{
VerifyPropertyName(propertyName);
PropertyChangedEventHandler handler = PropertyChanged;
if (handler == null)
{
return;
}
var e = new PropertyChangedEventArgs(propertyName);
handler(this, e);
}
}
Now we are ready for the MainViewModel. Add a new class to the ViewModels and name it MainViewModel. Make sure to derive from the BaseViewModel class. Because there is a lot of stuff going on in here, we are going to take it nice and easy getting through this. This is the class definition.
public class MainViewModel : BaseViewModel
{
}
The two things that we need right now is two private variables, one for the Model and one for the data that the View is going to display.
private readonly MainModel _model;
private DataTable _fileData;
Because I am simple minded, we are going to initialize the variables in the constructor:
public MainViewModel()
{
_model = new MainModel();
_fileData = new DataTable();
}
Now we need a method to call to get the data from the model:
public void GetData()
{
_model.GetFileData(“test.csv”);
FileData = _model.FileData;
}
We have hard code a file name here but, if you wanted to you could open a file browser and let the user select a file to open.
And then a property to expose the data to view:
public DataTable FileData
{
get
{
return _fileData;
}
set
{
_fileData = value;
OnPropertyChanged(“FileData”);
}
}
Notice that the property called OnPropertyChanged in the setter. When that happens the view is automatically updated with the changed information. Magic!
As long as we are here we are going to introduce a Command. The command that we are going to use is going to get used when the user clicks the Button on the main window. The command will get routed to the ViewModel and the ViewModel will handle the command. We are going to need another variable for the command:
private RelayCommand _getDataCommand;
We are going to use the RelayCommand class to encapsulate the RoutedCommand. The RelayCommand class was also written by Josh Smith. Now to expose the command to the View we do this:
public ICommand GetDataCommand
{
get
{
if (_getDataCommand == null)
{
_getDataCommand = new RelayCommand(param => GetData());
}
return _getDataCommand;
}
}
The main point of this is the initialization of the Command. The RelayCommand is passed the method that it is going to call when the button is clicked. In this case, the GetData method is going to be that method.
As hard as it is to believe, that is it for the hardest part. After the code listing we are off to the View. This is the complete listing for the MainViewModel:
public class MainViewModel : BaseViewModel
{
private readonly MainModel _model;
private DataTable _fileData;
private RelayCommand _getDataCommand;
public MainViewModel()
{
_model = new MainModel();
_fileData = new DataTable();
}
public DataTable FileData
{
get
{
return _fileData;
}
set
{
_fileData = value;
OnPropertyChanged(“FileData”);
}
}
public ICommand GetDataCommand
{
get
{
if (_getDataCommand == null)
{
_getDataCommand = new RelayCommand(param => GetData());
}
return _getDataCommand;
}
}
public void GetData()
{
_model.GetFileData(“test.csv”);
FileData = _model.FileData;
}
}
The View
The view is oh so simple, really. The first thing that you need to do is to go over to www.codeplex.com and get the WPFToolkit, http://www.codeplex.com/wpf. I used the data grid control for WPF for this example. So this will also show you how to use the data grid in a most basic fashion. So after you install the toolkit you will need to add a reference to the WPFToolkit.dll to the View project. Once you do that, you can add the namespace reference to the View XAML file. Open up the MainWindow.xaml file and add the namespace to the top of the file:
xmlns:dg=”clr-namespace:Microsoft.Windows.Controls;assembly=WpfToolkit”
This tells the program that we are going to be using the Microsoft.Windows.Controls namespace and we are going to reference in our code as “dg”. Once we have the namespace mapped in, we can include the data grid control and binding it to our data source:
<dg:DataGrid ItemsSource=”{Binding Path=FileData}” Margin=”0,30,0,0″ />
The ItemsSource property is binding to the FileData property of the ViewModel. And that is all you need to do here to get the data grid to show the data. Cool huh? The only other thing that we are going to do here is to add a button that we can use to tell the ViewModel to go get the data:
<Button Height=”22″HorizontalAlignment=”Left” Margin=”8,4,0,0″ Name=”button1″VerticalAlignment=”Top” Width=”48″ Command=”{Binding Path=GetDataCommand}”>Button</Button>
The important part of this is the “Command=”{Binding Path=GetDataCommand}”” part. This is the part that tells the program that when the button is clicked that it is to execute the GetDataCommand. If you recall the GetDataCommand is the command in the ViewModel that gets the data from the Model. There is not an event handler in the traditional sense. More of the magic of WPF. That is it for the XAML for the MainWindow. The XAML for the MainWindow now looks like this:
<Window x:Class=”Article.MainWindow”
xmlns=”http://schemas.microsoft.com/winfx/2006/xaml/presentation”
xmlns:x=”http://schemas.microsoft.com/winfx/2006/xaml”
xmlns:dg=”clr-namespace:Microsoft.Windows.Controls;assembly=WpfToolkit”
Title=”MainWindow” Height=”300″ Width=”300″>
<Grid>
<dg:DataGrid ItemsSource=”{Binding Path=FileData}” Margin=”0,30,0,0″ />
<Button Height=”22″HorizontalAlignment=”Left” Margin=”8,4,0,0″ Name=”button1″VerticalAlignment=”Top” Width=”48″ Command=”{Binding Path=GetDataCommand}”>Button</Button>
</Grid>
</Window>
Now, before we continue I have to say that this in not the only way to code this up. You caninstantiate the ViewModel in the XMAL and not do anything at all in the code behind however, I am going to save that for another time. That being said open up the MainWindow.cs file and find the constructor for the window. Right after the InitializeComponent method call, add the following:
DataContext = new MainViewModel();
That is all you need to do to set the DataContext of the window which is where the data binding looks to find the data. You will also need to add a reference to the ViewModel assembly. This is the MainWindow code:
namespace Article
{
using System.Windows;
using ViewModel.ViewModels;
public partial class MainWindow : Window
{
public MainWindow()
{
InitializeComponent();
DataContext = new MainViewModel();
}
}
}
Conclusion
That completes the discussion of the basic architecture of a WPF MVVM application. We created a basic Model class that read a .csv file and exposed that data as a property of the class. We created a base ViewModel class to serve as a base from which to build upon and created a derived ViewModel to bind the data to the View raising a NotifyPropertyChanged event to update the data binding. We also included in our ViewModel a command using a RelayCommand that would be used from the View to go get the data and the View displayed the data in the WPF data grid control through data binding. Attached is a Visual Studio 2008 solution containing all of the code discussed in this article, including the .csv file used to display data in the data grid. Rename the .doc file to .zip before trying to open it. This is a wordpress.com requirement. articlezip
Model-View-ViewModel in WPF Part I February 12, 2009
Posted by wesaday in Programming.Tags: CodeProject, MVVM, WPF
4 comments
Introduction
The Model-View-ViewModel (MVVM) is the current “standard” for developing applications in Windows Presentation Foundation but there seems to be no hard and fast rules. It’s more like a guideline. It took me a long time to figure what was going on in this design pattern. I read the articles written by John Gossman, http://blogs.msdn.com/johngossman/archive/2005/10/08/478683.aspx, and Dan Crevier http://blogs.msdn.com/dancre/archive/2006/10/11/datamodel-view-viewmodel-pattern-series.aspx but for the absolute beginner I was not able, or smart enough, to understand the material. After looking at a huge amount of example code and research I was finally able to decompose one of the example applications and figure out how it worked. This code that I am presenting here is a derivative of the demo application written by Josh Smith, http://joshsmithonwpf.wordpress.com. Josh is a WPF God and you can learn a lot from his articles. Anyway, after much frustration the pieces fell together and I began to comprehend what was going on in the MVVM.
The MVVM design pattern is sort of a descendent of the Model-View-Presenter design pattern. I published a series of articles introducing that design pattern starting here, https://wesaday.wordpress.com/2009/01/27/winforms-model-view-presenter-a-tutorial. However, the MVVM pattern takes advantage of some advanced features of WPF. I fully expect that this article will evolve into several parts also. Actually, I am just going to make this a two parter.
Goals
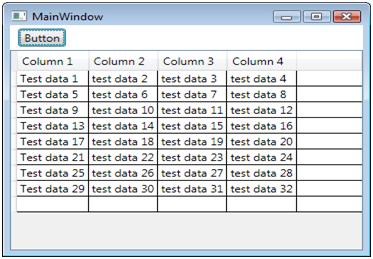
The goal of this article is to explain the MVVM pattern in an easy to understand tutorial manner, exploring the various facets. We will redo the application presented in the MVP article series in WPF. To recap, the final application will read a CSV file and display the data in a data grid in the main view and will turn out to look something like this:
The players
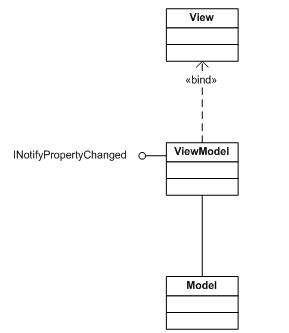
I learn best in a tutorial fashion so in this section we will introduce the entities that make up the MVVM. A simplified diagram of the design pattern might look something like this:
The View object pretty remains the same. This is the window and controls that the user sees and interacts with. The major goal in using this pattern is to move as much of the code to the ViewModel as possible making the View code-behind a desolate wasteland.
The ViewModel contains the properties that are used in databinding data to the View and handlers that respond to user input. The ViewModel assumes most of the responsibility of knowing what is going on in the View andhandling the Model. I would imagine that most of the code that you are going to write in a real world application would reside in the View Model. The ViewModel implements the INotifyPropertyChanged interface. This is really cool since when the data in the ViewModel changes, the INotifyPropertyChanged updates the databinding and the View magically gets updated with the updated information.
Our friend the Model does not change all that much. It is still responsible for obtaining the requested data and giving it to the ViewModel.
Setting up
The solution that I describe is what worked for me so that is what I am going to stick to. In no way should this be construed as production code. This is stripped down code that eliminated unnecessary code to get down to the guts of the method. To use this is production code; you would definitely want to implement error handling and checking. Also I will probably not describe how to add projects or classes to the solution as you should know that already.
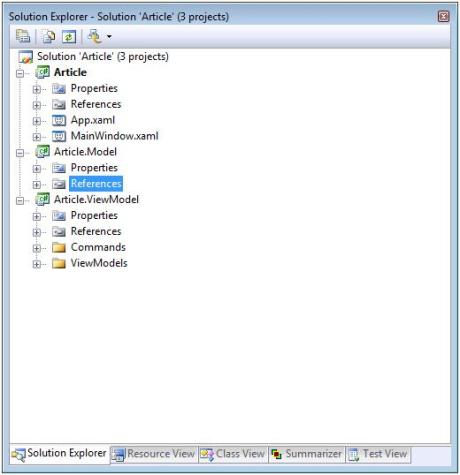
The first thing to do is to create a new WPF application. Being the imaginative soul that I am, I named my solution “Article”. You, of course, are free to name it whatever you want. I habitually rename the generated window class to “MainWindow”. Add to the solution two more projects. The first project I named Article.Model and the second I named Article.ViewModel. In the Article.ViewModel project, add two new folders name on “Commands” and name the other “ViewModels”. When you get all that done, your solution should end up looking something like this:
That is it for Part I. In Part II we will explore the Model, the View and the ViewModel in depth. And will include a sample solution illustrating the concepts.
Model-View-ViewModel February 11, 2009
Posted by wesaday in Programming.Tags: MVVM, WPF
add a comment
The WPF guru, Josh Smith, has published an excellent article describing the MVVM design pattern in WPF. You can read all about it on his blog, http://joshsmithonwpf.wordpress.com/ and you can follow the link to his article on MSDN. Well done Josh!
Karl Shifflet and Jaime Rodriguez conducted a MVVM class. You can get the presentation and code for Jaime’s blog here, http://blogs.msdn.com/jaimer/archive/2009/02/10/m-v-vm-training-day-sample-application-and-decks.aspx


