Winforms – Model-View-Presenter – A tutorial May 11, 2009
Posted by wesaday in Programming.Tags: CodeProject, Model View Presenter, MVP, Winforms
4 comments
Introduction
Coming from a C/C++ and diving into the .NET, I am constantly surrounded by strange phrases, three letter acronyms and concepts that take a long time to get used to. One of those concepts is the Model-View-Presenter (MVP). There are plenty of articles about MVP around the Web. Most are pointers to Martin Fowler (http://www.martinfowler.com/eaaDev/uiArchs.html) or the MSDN (http://msdn.microsoft.com/en-us/library/cc304760.aspx). There are also many articles on Code Project (www.codeproject.com). The problem that I have had in the reading of these articles is that most use big $.25 words and unfamiliar phrases that mean nothing to the beginner, along with diagrams that are just plain confusing. Nothing I found that was in plain simple English. After a lot of trial and error and study I think I finally have something that I can understand. I do not pretend that this is the “right way” or the only way but it works for me.
This is the first part of five. Links to the other parts are:
MVP
The goal of using the MVP design pattern is to separate the responsibilities of the application in such a manner as to make the application code:
· Testable in an automated manner
· Make the application more maintainable
· Make the application more extensible.
The first bullet means that there are many tools out there in the world that can be used to test code in an automated manner, called “unit testing”. These tools cannot test code that is in form code-behind modules. So the aim is to take that code out of the form code and place it in a DLL that can be tested.
I do not know about anyone else, but for me application code is way more maintainable when it is separated out into modules that have a specific purpose. If some unexpected feature does make it through the unit testing, then you will have a pretty good idea where to look just based on knowing what the various classes’ responsibilities are.
The extensibility part comes in when you have this separation of concerns, adding additional functionality is made easier because the code modules are not closely tied together also known as “loose coupling”.
What does it all mean?
The first thing is to understand the meaning of what the terms mean.
View: A view is any form or window that is shown to the user of the application.
Presenter: The presenter is an entity that presents the data to the view that is to be shown to the user.
Model: The model is the actual data that the Presenter will request and gets displayed in the View. The Model is responsible for obtaining the data. So the Model is the one that reads files, or connects to a database or if you are really ambitious, gets the data from a data service object.
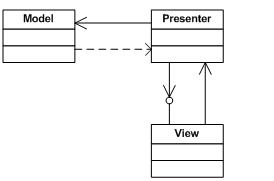
The pattern is typically drawn like this.

Looks simple doesn’t it? Well what all those other articles, and examples, didn’t tell me was how to turn that simple diagram into a working application.
Get on with it already!
The first thing to do is to setup the solution. Open up Visual Studio and create a new Windows Forms Application.

Once Visual Studio is through creating your new project, add a class library to the solution to hold all of the various classes. Right click your solution object in the Solution Explorer, select Add then Add new project.


I named mine Common.Lib.dll you can name yours whatever you want to. I have seen some people that create a class library to contain the business logic and another one to contain the data layer. I think is overkill for this simple example. Go ahead and delete the Class1.cs file that Visual Studio created for you.
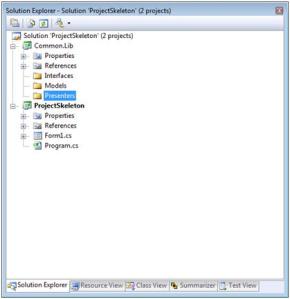
I like to compartmentalize things so I group like classes together. Right click on the class library project; select Add then Select New Folder. Name the new folder, Interfaces. Repeat twice more and name the other two new folders Models and Presenters. Your project should now look like this.

This is the end of Part 1. After starting the article it quickly grew to 14 pages and I was not done yet so I elected to post a series of pages.
This is the project skeleton so far. Change the extension from .doc to .zip before you open it. This is a workpress requirement. projectskeletonzip
Winform – Model-View-Presenter – Part V the View January 30, 2009
Posted by wesaday in Programming.Tags: CodeProject, Model View Presenter, Winforms
39 comments
Finally we come to the conclusion. This the the final part to the Model-View-Presenter in Winforms series.
Open the MainForm in the designer. This is probably the easiest step of all. Drag and drop a DataGridView on to the form. To make it look semi-decent, you might want to set the Anchor property so that the control fills the form as this is the only thing that we are going to do.
Now, open up the code-behind file. The first thing to do is to reference the class library in the main project. Right click the references in the solution explorer and select Add Reference. Click the Project tab, Select the Common.Lib.dll and then click OK.
To the usings statements, add a ‘using Common.Lib.Interfaces’ statement. Now we can go ahead and implement the IMainView interface.
using System;
using System.Collections.Generic;
using System.ComponentModel;
using System.Data;
using System.Drawing;
using System.Linq;
using System.Text;
using System.Windows.Forms;
using Common.Lib.Interfaces;
namespace ProjectSkeleton
{
public partial class Form1 : Form, IMainView
{
public Form1()
{
InitializeComponent();
}
#region IMainView Members
public DataSet CSVData
{
}
#endregion
}
}
This gives us a property that we will be using to bind the data to the DataGridView. Which is exactly what we are going to do. Bind the DataSource property of the DataGridView to the value of the DataSet like this:
public DataSet CSVData
{
set { dataGridView1.DataSource = value.Tables[0]; }
}
Now we need to instantiate the Presenter and give is a file name to open. I hard coded a file name in this example. Of course you could implement a file browser and open any file that you can. Create a private member of the DataPresenter;
private DataPresenter _presenter;
Then instantiate the presenter passing is the mainview so it can give us the data. Then finally tell the presenter to open the test file.
_presenter = new DataPresenter(this);
_presenter.Display(“test.csv”);
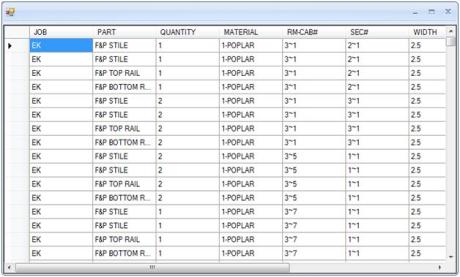
Now you can run the solution and you should be able to see the grid is filled with the data from the test.csv file. There you have a complete solution that demonstrates the Model-View-Presenter design pattern with Winforms. There is a link to the complete Visual Studio 2008 solution below. Rename the .doc filename to .zip before you open it. This is a wordpress requirement. finalzip This link is the document that contains the all 14 pages of the text. The caveat is that the document may or may not exactly match since I have had to do a lot of editing online 🙂 mvp-in-winforms Note that this is an Office 2007 document.
Winforms – Model-View-Presenter – Part IV the Presenter January 29, 2009
Posted by wesaday in Programming.Tags: CodeProject, Model View Presenter, Winforms
4 comments
This is the fourth in a series describing the MVP pattern in Winforms.
The Presenter
Add two classes to the Presenters folder. One named Presenter and the other named DataPresenter. We are going to implement the Presenter as a generic so in case you change the Model or the View we could use the same Presenter or interchange Presenter classes. This will make enhancing the example as a base application easier. So declare the Presenter class as a Generic class where the parameter implements the IBaseInterface interface:
public class Presenter<T> where T : IBaseInterface
{
}
Now declare two class properties, one for the Model and one for the View. Since the Presenter, and derivations, is the only one that will be using these properties, make them protected.
protected static IModel Model { get; private set; }
protected T View { get; private set; }
Now we are going to create two contructors, a static constructor and an public constructor that takes a parameter. The static constructor is going to initialize the Model for us. The other constructor is going to set the view for us. There also other ways to do this. I have seen where the Model is set in the constructor when the class is instantitated. It’s a matter of style. This way seems “cleaner” to me as the view does not have to know about the Model so the Presenters can use different Models and the View does need to know anything about it.
So our base Presenter class now looks like this:
using Common.Lib.Interfaces;
using Common.Lib.Models;
namespace Common.Lib.Presenters
{
public class Presenter<T> where T : IBaseInterface
{
protected static IModel Model { get; private set; }
protected T View { get; private set; }
static Presenter()
{
Model = new Model();
}
public Presenter(T view)
{
View = view;
}
}
}
Okay now. For the real Presenter class. Open up the DataPresenter class. The first thing to do is to modify the class definition to derive from the Presenter class and define what the interface for our view that we are going to handle.
public class DataPresenter : Presenter<IMainView>
{
}
Then this class simply needs to define a constructor and a public method to call to get the data from the Model and give it to the View.
public DataPresenter(IMainView view)
: base(view)
{
}
public void Display(string filename)
{
if (View != null) View.CSVData= Model.GetData(filename);
}
The constructor is passed a IMainView interface which is also passed along to the base class. This also give access to the Model that is instantiated in the base class. The method simply calls the Model’s GetData method passing along the filename to get the data from and giving that back to the View. This is it for the class library. All we need to do now to finish this up is to finish our main view.
This is the Visual Studio 2008 project so far. Change the name from .doc to .zip before you open it. This is a wordpress requirement. presenterzip
Winform – Model-View-Presenter – tutorial Part III the Model January 28, 2009
Posted by wesaday in Programming.Tags: CodeProject, Model View Presenter, MVP, Winforms
2 comments
This is the third part of the MVP tutorial series. In this part we are going to discuss…
The Model
The Model provides a “model” for the data that is going to be exposed to the View. Add a new class and call it “Model”. Then have the class implement the IModel interface.
using Common.Lib.Interfaces;
namespace Common.Lib.Models
{
public class Model : IModel
{
}
}
Now if you were to compile the project, you get an error because we said that we would implement the interface but have not yet. Right click on the IModel interface text in the editor then select Implement Interface, then select Implement Interface on the sub menu.
Once you do that, Visual Studio will write a skeleton implementation for all of the methods in the IModel interface. In this case, Visual Studio will create a method named GetData taking a string as a parameter and returning a DataSet. Go ahead and delete the throwing of the not implemented exception. So you should end up with something like this:
using Common.Lib.Interfaces;
namespace Common.Lib.Models
{
public class Model : IModel
{
#region IModel Members
public System.Data.DataSet GetData(string filename)
{
}
#endregion
}
}
To fill the method in, we add the following code:
string connectionString =
@”Provider=Microsoft.Jet.OLEDB.4.0;Data Source=c:\csvfiles\;Extended Properties=’text;HDR=Yes'”;
string commandText = string.Format(“Select * from {0}”, filename);
OleDbConnection conn = new OleDbConnection(connectionString);
OleDbCommand cmd = new OleDbCommand(commandText, conn);
conn.Open();
OleDbDataAdapter da = new OleDbDataAdapter(commandText, conn);
DataSet JobData = new DataSet();
da.Fill(JobData);
return JobData;
This is going to some of the hard work for us. Of course you are free to get the data from any source that you want to. Basically all we are doing here is using OLEDB to open a file in the csvfiles directory on the C drive and filling a DataSet with the data in the file. Of courses for production code you would check for errors and take appropriate action but this is just an example. That’s all there is to do for the Model.
This is a zip with the project so far. Rename the .doc to .zip before you open. This is a wordpress requirement. modelszip
Winforms – Model-View-Presenter – Part II The interface January 27, 2009
Posted by wesaday in Programming.Tags: CodeProject, Model View Presenter, MVP, Winforms
3 comments
This is part II of the MVP series for Winforms.
For this example we are going to create a very simple application. Our example is going to load a CSV file and display it in a data grid. But, it’s not what the application does that is important. The important thing is how the application does it. The final application will look like this:
Interface this!
The key to the whole thing is the interface. Now the interface is kind of a strange animal to me. An interface is declared in code like this:
public interface IMyInterface
{
}
In my previous work, an interface was basically a set of functions that you could call on objects and get results back. In the .NET world and interface is an actual object. Not only can you pass an interface between other objects but you can assign the interface to a variable like any other data type!
public class MyClass
{
private IMyInterface myInterface;
}
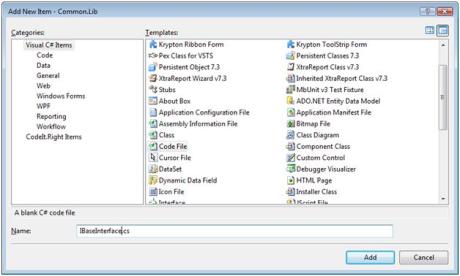
The purpose of the interfaces is to allow the Presenters to communicate back to the View in a loosely coupled way. The Presenter uses the interface to update the data that the View is showing to the user. And that is what we are going to do now. It is important to note that the interface defines a type of contract. It does not actually contain any code on its own but causes the class that inherits the interface to implement the contract. Right click on the Interfaces folder in the solution, then select Add, then New item. Select Code File and name it IBaseInterface, then click Add,
This interface will just serve as a base interface that all the other interfaces can inherit from. For this example this interface will not actually do anything. Define the interface,
namespace Common.Lib.Interfaces
{
public interface IBaseInterface
{
}
}
The Main View interface
Save that file and repeat the process only name this interface IMainView. This class is going to serve as the interface the Presenter is going to use to communicate with the Main view. Define the interface and inherit from our base interface,
namespace Common.Lib.Interfaces
{
public interface IMainView : IBaseInterface
{
}
}
Now what we are wanting to do is to display some data in a DataGridView on the main form. So since the main form is going to be implementing the interface. How that is going to be done is to databind the data to the grid. So, what we want the interface to do is to expose a property that will be used by the Presenter to supply the data. So, add a property to the interface that is a DataSet type with a property setter,
public interface IMainView : IBaseInterface
{
DataSet CSVData { set; }
}
To use the DataSet type you will have to add a using System.Data statement to the file. The entire file looks like this:
using System.Data;
namespace Common.Lib.Interfaces
{
public interface IMainView : IBaseInterface
{
DataSet CSVData { set; }
}
}
The Model interface
Now we are going to define an interface for the Model. Add a new code file and name it IModel. The Model interface is going to define the function that will be used to retrieve the data from the file (or where ever else you want to get it from). Since we defined that the data would be in a DataSet, we need a function that will return a DataSet. So add a function definition GetData that takes the name of the file as a string and returns a DataSet:
public interface IModel
{
DataSet GetJobData(string filename);
}
Remember to add the System.Data namespace to the top of the file.
using System.Data;
namespace Common.Lib.Interfaces
{
public interface IModel : IBaseInterface
{
DataSet GetData(string filename);
}
}
That’s it for the interfaces. This is a Visual Studio 2008 solution with our app so far. Rename the file from .doc to .zip, this is a wordpress requirement. interfaceszip
Winforms – Model-View-Presenter – A tutorial, the introduction January 27, 2009
Posted by wesaday in Programming.Tags: CodeProject, Model View Presenter, MVP, tutorial, Winforms
4 comments
Introduction
Coming from a C/C++ and diving into the .NET, I am constantly surrounded by strange phrases, three letter acronyms and concepts that take a long time to get used to. One of those concepts is the Model-View-Presenter (MVP). There are plenty of articles about MVP around the Web. Most are pointers to Martin Fowler (http://www.martinfowler.com/eaaDev/uiArchs.html) or the MSDN (http://msdn.microsoft.com/en-us/library/cc304760.aspx). There are also many articles on Code Project (www.codeproject.com). The problem that I have had in the reading of these articles is that most use big $.25 words and unfamiliar phrases that mean nothing to the beginner, along with diagrams that are just plain confusing. Nothing I found that was in plain simple English. After a lot of trial and error and study I think I finally have something that I can understand. I do not pretend that this is the “right way” or the only way but it works for me.
This is the first part of five. Links to the other parts are:
MVP
The goal of using the MVP design pattern is to separate the responsibilities of the application in such a manner as to make the application code:
· Testable in an automated manner
· Make the application more maintainable
· Make the application more extensible.
The first bullet means that there are many tools out there in the world that can be used to test code in an automated manner, called “unit testing”. These tools cannot test code that is in form code-behind modules. So the aim is to take that code out of the form code and place it in a DLL that can be tested.
I do not know about anyone else, but for me application code is way more maintainable when it is separated out into modules that have a specific purpose. If something unexpected feature does make it through the unit testing, then you will have a pretty good idea where to look just based on knowing what the various classes’ responsibilities are.
The extensibility part comes in when you have this separation of concerns, adding additional functionality is made easier because the code modules are not closely tied together also known as “loose coupling”.
What does it all mean?
The first thing is to understand the meaning of what the terms mean.
View: A view is any form or window that is shown to the user of the application.
Presenter: The presenter is an entity that presents the data to the view that is to be shown to the user.
Model: The model is the actual data that the Presenter will request and gets displayed in the View. The Model is responsible for obtaining the data. So the Model is the one that reads files, or connects to a database or if you are really ambitious, gets the data from a data service object.
The pattern is typically drawn like this.

Looks simple doesn’t it? Well what all those other articles, and examples, didn’t tell me was how to turn that simple diagram into a working application.
Get on with it already!
The first thing to do is to setup the solution. Open up Visual Studio and create a new Windows Forms Application.

Once Visual Studio is through creating your new project, add a class library to the solution to hold all of the various classes. Right click your solution object in the Solution Explorer, select Add then Add new project.


I named mine Common.Lib.dll you can name yours whatever you want to. I have seen some people that create a class library to contain the business logic and another one to contain the data layer. I think is overkill for this simple example. Go ahead and delete the Class1.cs file that Visual Studio created for you.
I like to compartmentalize things so I group like classes together. Right click on the class library project; select Add then Select New Folder. Name the new folder, Interfaces. Repeat twice more and name the other two new folders Models and Presenters. Your project should now look like this.

This is the end of Part 1. After starting the article it quickly grew to 14 pages and I was not done yet so I elected to post a series of pages.
This is the project skeleton so far. Change the extension from .doc to .zip before you open it. This is a workpress requirement. projectskeletonzip


